Adding a casita to your property is an exciting way to get more space while creating something flexible. Whether you’re thinking of a guest suite, home office, or a private getaway, building a casita brings a lot of benefits. As its popularity grows, more homeowners are turning to this compact style of living for added convenience and value.
Still, starting construction without knowing what’s ahead can lead to delays, stress, and unrealistic expectations. That’s why it helps to understand how a typical casita construction timeline works. Getting a clear picture of each step makes the entire process run more smoothly and helps you stay one step ahead.
Initial Planning And Design Phase
The first phase is where ideas take shape. Planning and design set the direction for everything that follows, so it’s important not to rush it. This is where you decide how your casita will look, what features matter most, and how everything will fit within your lot. It might be tempting to start with the build right away, but skipping or shortening this stage can cause bigger issues down the line.
A great design doesn’t just look good. It blends function and style while working within the space you have. This is typically the point where you’ll begin working with modern casita builders who can take your ideas and turn them into solid plans. You’ll talk through layout, square footage, room usage, and more. The design should reflect how you plan to use the space long-term, not just how it looks right now.
Once the design is finalized, permits need to be filed with the local building authority. This part isn’t fun, but it’s necessary. How long it takes to get permits approved can vary, so it’s a good idea to factor that waiting period into the overall timeline. In some cases, your project might need a few design changes to meet requirements. Starting with a realistic mindset keeps surprises at a minimum as your vision starts to become real.
Site Preparation And Foundation Work
After the plans are locked in and permits are approved, it’s time for the physical work to begin. Site prep isn’t flashy, but it’s one of the most important parts of the job. Getting the land ready clears the way for everything that comes next.
Here’s what usually happens during this stage:
1. The building area is marked and any unwanted vegetation is cleared. This might also include trees, debris, or old structures.
2. The ground is leveled and soil is compacted to make a firm base.
3. Trenches are dug for things like plumbing and utility lines.
Once the land is prepared, the foundation is poured. This step has to be done with care. The foundation supports the entire structure, so any mistakes here can lead to some serious fixes later. Teams will check to make sure it’s level and properly set before moving on to the next part of the build.
Weather can sometimes delay this part of the process. Heavy rain or freezing temperatures may push back the timeline a bit. That’s okay, as long as you’ve built in time for the unexpected. Being patient during this phase can save time and money in the long run. Once the foundation cures correctly, you’re ready to move into building the visible parts of your new casita.
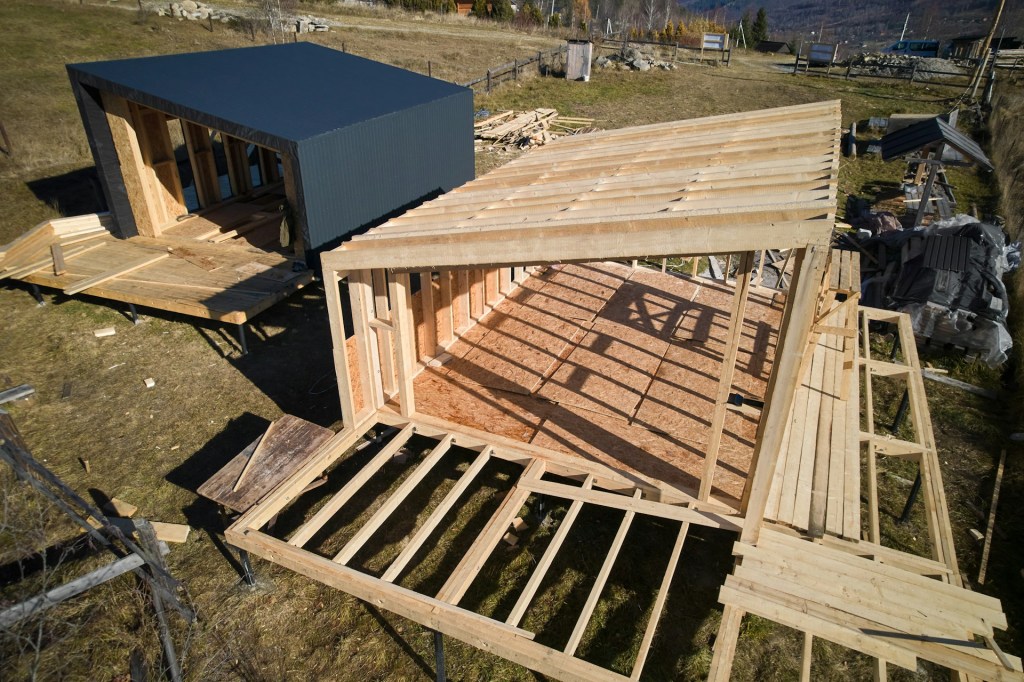
Framing And Structural Development
Once the foundation has cured, framing starts. This is one of the most visible and exciting parts of the process because you’ll finally see the shape of the casita come to life. During this phase, the floors, walls, and roof structures are built. It gives the project its basic outline, helping everyone visualize the layout more clearly.
After the frame is in place, roofing is added and walls are covered with sheathing to get the building sealed from the elements. That’s often called drying in. Once it’s dried in, construction can continue even in less-than-perfect weather. Depending on the building plan, this stage might also include installing windows and exterior doors to secure the structure further.
This part of the build gets several inspections. Things like structural integrity, framing quality, and rough positioning of mechanical systems are checked before moving into the next set of steps. These checkpoints help keep everything on track and make sure nothing has been missed. Think of it like pausing at a few rest stops on a long drive. They slow you down for a moment but keep you from getting off course later.
Interior And Exterior Finishing
After the structure is sound and weather-tight, the real detailing begins. This phase covers everything that makes a casita feel complete and livable. Electrical wiring, plumbing lines, and HVAC ducts are installed behind the walls first. Once that’s inspected and approved, insulation is added, and drywall goes up.
Once the walls are closed, there’s a lot that happens quickly:
1. Taping and texturing the drywall
2. Primer and interior paint colors
3. Trimming out windows and doors
4. Cabinets, tile, and flooring
5. Fixtures for lighting and plumbing
6. Exterior siding and painting
7. Front porches or patios, if included
8. Driveway pads or small pathways
Outside, the finishing touches help the structure blend in or stand out, depending on your style. Some folks go with desert landscaping for ease of upkeep, while others choose turf or a small garden bed. Whatever the decision, this stage is where design choices are fully brought to life.
Final Inspections And Project Completion
Before construction can be called complete, there are a few final steps. Local building officials will walk through the finished casita to check if everything lines up with code and the approved plans. Once these inspections are cleared, the space gets its official sign-off.
After approvals, crews clean the site and remove any leftover building materials. The driveway gets cleared, windows get washed, and the inside is swept and checked. The final punch list covers small details, like tightening door handles, adjusting cabinet hinges, or fixing paint touch-ups.
Once that’s done, you’ll get the final paperwork and keys. Depending on your builder, this may include warranty information or a walk-through to explain how different systems work inside the casita. At this point, the building process is complete, and your new space is ready for its next chapter.
Making Your New Casita Feel Like Home
This is where it gets fun. After all the noise, dust, and decisions, making your casita feel personal is the reward. Whether it’s a peaceful retreat, a guest house, or a creative studio, the goal is to make it work for your lifestyle.
Here are a few simple ideas to help you ease into the space:
1. Go for furniture that fits. Oversized pieces can overwhelm a small layout.
2. Stick to light, natural paint colors to keep the space open and bright.
3. Use vertical storage like shelves and hanging racks to free up the floor.
4. Add rugs, curtains, and houseplants to make the inside cozy.
5. Choose low-maintenance landscaping elements such as gravel, native plants, or simple turf.
A small space doesn’t have to feel tight. One homeowner used a Murphy bed that folded into a cabinet so the same room could switch between their home office and a weekend guest space. Creative use of furniture makes a big difference.
Adding thoughtful details not only makes the space more welcoming, it keeps you loving it longer. Whether you’re using it every day or just on special occasions, your casita should feel like a true part of your home.
Complete your property’s transformation with the expertise of modern casita builders. When you’re ready to expand your living space with a stylish and functional addition, explore the full range of options available through LJ Builders. We provide the guidance and craftsmanship needed to help bring your new space to life.
